onsdag 20 april 2011

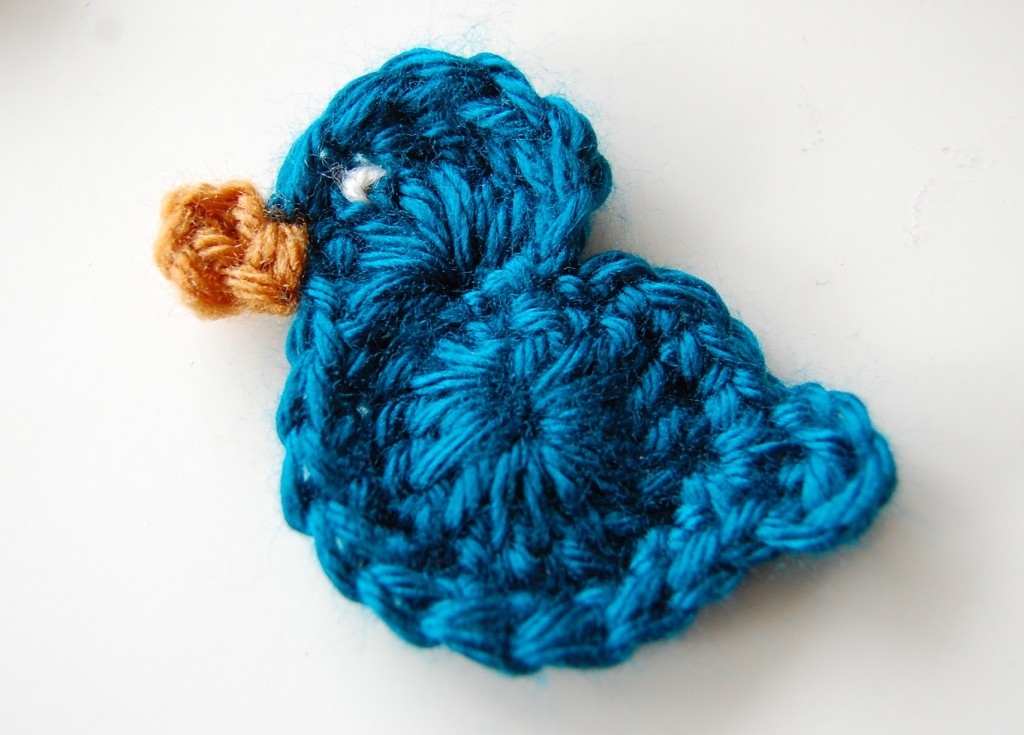
Fågel


Materials

Size G (4.25mm) crochet hook
Worsted weight yarn

Pattern
Chain 4, join with sl st to form ring

Round 1: Ch 2 (counts as first dc), 14 more dc into ring (15 sts)

Round 2: Ch 1 (counts as first sc). Into same stitch, work [dc, 5 trc, dc, sc].  (Bird head). Sc in each of next 10 sc (around  bird belly).  Into next stitch, work [sc, ch 1, dc, ch 1, sc] (bird tail). Sc in each of next 3 sc (bird back).

Fasten off, weave in ends.

Bird Beak

Join yellow yarn at base of your bird’s head. Ch 4, sl st back into the stitch where you joined your yarn.

Fasten off, weave in ends.


fredag 15 april 2011

Sommar snäckmössa!

free pattern adult spring hat


Abbreviations and Stitches used:

st- stitch

sp- space

mc/r- magic circle/ring (watch this video tutorial

ch- chain

sl st- slip stitch
insert hook, yarn over, pull through, (two loops on hook), pull loop closest to hook through other loop

hdc- half double crochet
yarn over, insert hook, yarn over, pull through (three loops on hook), yarn over, pull through all three loops

dc- double crochet
yarn over, insert hook, yarn over, pull through (three loops on hook), yarn over, pull through first two loops on hook, yarn over and pull through last two loops


Materials:
5.5 m (I) hook for hat
4.0mm (G) hook for appliques
leaves
rossettes
100% cotton yarn in your choice of colors
embroidery needle


Gauge:
1st 2 rounds- 2.5”
Flat Circle- 6.25” (after round 5)

Finished Hat Size:
Lenght (not including brim)- 7.0″
Brim- 1.5″
Circumference- approx. 20.0”


Notes:
Use minimal tension when making this hat
Be sure to gauge your work


Pattern:

1. Mc/r with 12dc, join round with sl st

2. Ch 2.  skip 1st st. 2dc in next st and in every st around.  Last 2dc will be placed into the sp previously left empty.   Sl st into next dc to join round <24> Should measure 2.5″

3. Ch 2.  skip 1st st.  *1dc in next st.   2dc in next st.  Repeat from * around.  Last 2dc will be placed into the st previously left empty.   Sl st into next dc to join round <36>

4. Ch 2.  skip 1st st.  *1dc in next st.  1dc in next st.  2dc in next st.  Repeat from * around.  Last 2dc will be placed into the st previously left empty.   Sl st into next dc to join round <48>

5. Ch2.  Skip 1st st.  -1dc in next st.  1dc in next st.  1dc in next st.  2dc in next st.  Repeat from * around.  Last 2dc will be placed into the st previously left empty.  Sl st into the nest dc to join round <60>
This round should measure 6.25” when completed

6. Ch 2, 3dc in same st.  *Skip 3st.  4dc in next st.  Repeat from * around.  Join round with sl st <15 shells>

7. Sl st into next st, then sl st into the space between the next two posts (you will be in the center of the 4dc shell).  Ch 2, 3dc in same space.  *Skip next 3 sp.  4dc in next sp.  Repeat from * around.  Join round with sl st <15 shells>

8. Sl st into next st, then sl st into the space between the next two posts.  Ch 2, 3dc in same space.  *Skip next 3 sp.  4dc in next sp.  Repeat from * around.  Join round with sl st <15 shells>

9. Sl st into next st, then sl st into the space between the next two posts.  Ch 2, 3dc in same space.  *Skip next 3 sp.  4dc in next sp.  Repeat from * around.  Join round with sl st <15 shells>

10. Sl st into next st, then sl st into the space between the next two posts.  Ch 2, 3dc in same space.  *Skip next 3 sp.  4dc in next sp.  Repeat from * around.  Join round with sl st <15 shells>

11. Sl st into next st, then sl st into the space between the next two posts.  Ch 2, 3dc in same space.  *Skip next 3 sp.  4dc in next sp.  Repeat from * around.  Join round with sl st <15 shells>

12. Sl st into next st, then sl st into the space between the next two posts.  Ch 2, 3dc in same space.  *Skip next 3 sp.  4dc in next sp.  Repeat from * around.  Join round with sl st <15 shells>

13. Change to border color. *1hdc in to next three st.  1hdc in space between shells.  Repeat from * around, join round with sl st <60>

14. 1hdc in every st around <60>

15.Change back to hat color.  Ch 2.  skip next st. *2dc in each of next 9 st.  3dc in 10th sp.  Repeat from * around.  Last 3dc will be placed into the space previously skipped.   sl st into the next dc to join round <126>

16. Ch 2.  skip next st, 1dc in each sp around.  Last dc will be placed into the sp previously skipped, sl st into the next dc to join round <126>

17. Sl st around entire hat in back loops only.  Fasten off and weave in all ends


Add appliques of your choice, I used the following:

rosettes- 1 medium and 2 small

leaves- medium and small fat bottom leaves, 1 each

torsdag 14 april 2011

Pannband

Originalet finns här!

Virknål 4,5 mm


55 lm

Rad1 – hst i andra lm från nålen, hst i resterande lm, lm, vänd (53)

*Byt färg här om du vill ha annan färg på ytterkanterna

Rad2 - *4 fm, hö 1 fm, sm i nästa m, hö 1 fm, repetera från * varvet ut, 4 fm i sista m

Rad3 – virkas på motsatta sidan av rad1, sm i första m *4 fm i nästa m, hö 1 fm, sm i nästa fm, hö 1 fm, repetera från * varvet ut, sm i sista maskan


Montering – Sy ihop kortändarna räta mot räta. Trä ett elastiskt band längs med pannbandet och vänd sedan rätsidan ut. Sy fast dekorationer om du vill.


Sommar hat


HAT PATTERN:
Yarn: Cotton yarn (Sugar 'n Cream also works well with this pattern).
Hook size: F - 3.75mm

Make a magic circle.

Flat circle for the top:
Round 1: Ch 1, 7 sc through the loop. Do not join, place marker and work a continual round.
Round 2: 2 sc in each sc around (14 sc)
Round 3: *1 sc in the next stitch, 2 sc in the next stitch. Continue around from *. (21 sc)
Round 4: *1 sc in each of the next 2 stitches, 2 sc in the next stitch. Continue around from *. (28 sc)
Round 5: *1 sc in each of the next 3 stitches, 2 sc in the next stitch. Continue around from *. (35 sc)
Round 6: *1 sc in each of the next 4 stitches, 2 sc in the next stitch. Continue around from *. (42 sc)
Round 7: *1 sc in each of the next 5 stitches, 2 sc in the next stitch. Continue around from *. (49 sc)
Round 8: *1 sc in each of the next 6 stitches, 2 sc in the next stitch. Continue around from *. (56 sc)
Round 9: *1 sc in each of the next 7 stitches, 2 sc in the next stitch. Continue around from *. (63 sc)
Round 10: *1 sc in each of the next 8 stitches, 2 sc in the next stitch. Continue around from *. (70 sc)
Round 11: *1 sc in each of the next 9 stitches, 2 sc in the next stitch. Continue around from *. (77 sc)
Round 12: sc in each sc around. (77 sc)
Round 13: *1 sc in each of the next 10 stitches, 2 sc in the next stitch. Continue around from *. (84 sc)
Round 14: sc in each sc around. (84 sc). Slip stitch to the next 2 stitches.
You can adjust this flat top to fit your head by adding more or subtracting the last row (84 sts).

Hat body:
Round 1: Ch 3, 2 dc in the same stitch, skip 2 stitches, *3 dc in the next stitch, skip 2 stitches. Repeat from * till the last shell, join with the beginning chain. (28 shells - 84 sts)
Round 2: Ch 3, 2 dc in the same space, *3 dc in the next space. Repeat from * to the last space, join with the beginning chain. (28 shells - 84 sts)
From round 3: Repeat round 2 until you get the desired length.

Hat brim:
Round 1: Ch 1, sc in the same stitch, sc in the next 5 stitches, 2 sc in the next stitch. *sc in the 6 next stitches, 2 sc in the next stitch. Continue around from *. Do not join. (96 sc)
Round 2: sc in each sc around. (96 sc)
Round 3: *sc in the 7 next stitches, 2 sc in the next stitch. Continue around from *. (108 sc)
Round 4: sc in each sc around. (108 sc)
Round 5: *sc in the 8 next stitches, 2 sc in the next stitch. Continue around from *. (120 sc)
Round 6: sc in each sc around. (120 sc)
Round 7: sc in each sc around. (120 sc)
Round 8: *sc in the 9 next stitches, 2 sc in the next stitch. Continue around from *. (132 sc)
Round 9: sc in each sc around. (132 sc)
Round 10: sc in each sc around. (132 sc)
Round 11: sc in each sc around. (132 sc)
Slip stitch (or reverse sc all around) the last round.

There you have the hat pattern, appreciate if you point out any mistake I might have. Thank you!

söndag 10 april 2011

Fågel


You can use any yarn with appropriate size hook for this.  The yarn type & hook size will determine the finished size of the chick. The yellow one is made with worsted weight yarn & a 5mm hook. The finished size is 2.75 inches beak to tail & 2.5 inches top to bottom.

Here is the basic technique.
ch = chain
sl st = slip stitch
sc = single crochet
dc = double crochet
hdc = half double crochet
trc = triple crochet
quadc = quadruple crochet, yo 3 times, insert hook into st, pull up loop, yo pull through 2 loop 4 times
pentc = penta crochet, yo 4 times, insert hook into st, pull up loop, yo pull through 2 loops 5 times

Sorry for the weird names of quadc & pentc, but I don't know the names of these stitches, so I called them what made sense to me. Does anyone know their official name? Couldn't find it on google.

R1 - 10 sc in a magic loop. If you don't know how to crochet in a magic loop you can watch a video here.  Tighten your magic loop but do not join with a slip stitch as you may be accustomed to doing. Instead just make the first stitch on the second round in the first sc of the first round.

R2 - 2sc in the first st (you may want to mark the first sc with a stitch marker), sc in 2nd, hdc then dc in 3rd, 2dc in 4th and 5th, 2sc in 6th, sc then dc in 7th,  2 trc in 8th, 2 quadc in 9th,  2 quadc in 10th. Again do not join.

R3 - Now your next stitch should be the first sc of the second round. In this stitch do 2 quadc & 1 pentac. Ch1, sl st in the same space (this will give a tiny point to the tail feathers). Now sl st down the side of the pentc going right to left. Join when you meet up with the next stitch.  It will look like this.


Now you should see the shape of the chick, but the tail part has such long stitches that it doesn't hold together.  So, tie off leaving a long tail to sew with. Flip the chick over and sew up and down the backs of all those stitches.  You will see little loops going up the back of each stitch.


Sew up and down under these little loops in rows to secure your stitches together.


For the eye sew a french knot between the 7th & 8th stitch of the second round. I first sewed a small straight stitch between the two catching a few threads from each and then sewed the french knot into the straight stitch to give it something to hold on to.

For the beak - join beak yarn in the 10th stitch of the second row. sc in the same stitch. fasten off and weave ends.

lördag 2 april 2011

Baguette Väska


WW yarn. Red Heart is best b/c it is stiff and sturdy
G or H hook
1" button

R1 Ch50, 6dc in the 4th ch from the hook. (the first skipped 3 chs count as the first dc) dc in the next 45 chs, 7dc in the last ch, along the opposite side of the chain, dc in the remaining 45 chs. Join with a slst to the first dc. (104dc)

R2 Ch3, dc in same st, 2dc in the next 6 sts, dc in the next 45 chs, 2dc in the next 7 sts, dc in the remaining 45 sts. Join with a slst to the first dc. (118dc)

R3 Ch3, dc in the same sp, dc in the next st, *2dc in the next st, dc in the next st. * 6 times, (so far you have 21dc) dc in the next 45 dc, *2dc in the next st, dc in the next st* 7 times, dc in the last 45 dc. Join with a slst to the first dc. (132dc)

R4 Ch3, In Back Loops Only, dc in each st around. Join with a slst to the first dc. (132dc)

R5 Ch2, (does not count as a st now and through out, just brings you up to stitch level) Fpdc around same st as joining, fpdc around each st around. Join with a slst to the first fpdc. Skipping the beg. ch2. (132 fpdc)

R6-R14 Ch2, Fpdc around same st as joining, fpdc around each fpdc. Join with a slst to the first fpdc. Skipping the beg. ch2. (132 fpdc) (You can keep repeating these rows untill it is as tall as you like)

R15 (Making pleats in this row) Ch1, sc in same sp, sc in the next 38 sts, skip 4 sts, sc in the next 2 sts, skip the next 4 sts, sc in the next 57 sts, skip the next 4 sts, sc in the next 2 sts, skip the next 4 sts, sc in the last 16 sts. Slst to the first sc to join. (115 sc)

R16 Ch2, dc in the same sp, dc in each sc around. Join with a slst to the first dc. Skipping the beg. ch2. (115 dc)

R17 Ch1, sc in same sp, sc in each st around. Slst to the first sc to join. Finish off and weave in ends. (115 sc)

Loop

R1 Find the center 4 sts right above the center pleats on back row, (where you join rounds). Attach yarn to the last row (top sc row) back loops right above the pleats, ch3, dc in next 3 sts, (all 4 dc should be directly centered above the center pleats).

R2 Turn, ch1, sc in same sp and next 3 sts. (4sc)

R3 Turn, ch3, dc in the next 3 sts. (4dc)

Repeat R2 and R3, 2 times, Turn, ch3, dc in next st, ch4, dc in last 2 sts. (4dc and 1, ch4 sp)

Turn, ch1, sc in same sp and next dc, 5sc in the ch4 loop, sc in last 2 dc and finish off.

Sew button to the other side in the center, above the pleats on R16. (the dc row)

Straps~ Here you make 2 straps, 1 on the front and 1 on the back. It is the same sts as the Loop. Just center the straps in place on either side of the pleats.

R1 Attach yarn in desired location for the handle, ch3, dc in next 3 sts. (4 dc) (I went 12 sts to the left of the center pleats, attached my yarn and made my 1st. four sts here. Then when desired length of strap is achieved, attached to the corresponding # of sts on the right side of the pleats. So they are centered on either side of the pleats.)

R2 Turn, ch1, sc in same sp and next 3 sts. (4sc)

R3 Turn, ch3, dc in the next 3 sts. (4dc)

Repeat R2 and R3, as many times as needed to get the desired length of strap. Finish off, leaving a tail long enough to sew the strap onto the other side of the pleats. Repeat on the opposite side.